Feeds:
Posts
Comments

Hens and Chicks


Hens and Chicks in my tree ring garden.


Hens and Chicks, or Sempervivum, as they’re otherwise known, are a hardy succulent. They are popular as ground cover as well as in rock gardens. Hens and chicks take minimal care and can grown in very little soil. They are perfectly placed in shallow dirt that accumulates in rock walls or mounds of boulders as their lush green color adds a nice contrast.


Hens and Chicks nestled in the rocks.


Hens and chicks do well in areas that receive very little water and lots of direct sunlight. But, they do equally well in gardens that are partially shaded and are watered regularly.


This Hen is quite crowded by some rather large chicks.


Propagating Hens and Chicks is quite easy. When the chicks grow they come on as little “buds” on the side of the Hen. Soon, they sprout their own roots and are ready to be moved. Hens and chicks have shallow root systems and to propagate them you simply grasp the little chick and gently pull it away from the hen. This will disengage the single root of the chick. The chick is then ready to be planted. Simply scratch a shallow trench, place the chick’s root inside and cover with soil. Give the chick a little water and soon it will be having chicks of its own.


This hen went a little crazy in the chick department.


When a hen is approximately 3 to 4 years old it will send up a shoot which can reach 15 inches tall. This shoot will burst with colorful blooms which can last a month or more. Then, when it’s finished blooming, the hen will die. Sort of a last hurrah.


A hen in bloom – beautiful!


A garden full of hens in bloom is beautiful. And, although the hen dies when it is finished blooming, don’t despair; simply pluck the spent hen out of the ground and replace her with a fresh chick. The chick will soon grow and fill in the vacant spot.

Attributes of Hens and Chicks (Sempervivum)

  • Low maintenance
  • Drought tolerant
  • Sun tolerant
  • Ground cover
  • Deer and rabbit tolerant
  • Can grow in shallow, sandy soil

Hens and chicks can be found in most nurseries and gardening centers as well as through seed and plant catalogs such as Dutch Gardens.

Happy gardening!

I am very happy to announce the arrival of my gardening ebook, Vegetable Gardening for Beginners: The Beginner’s Guide to a Bountiful, Beautiful Vegetable Garden.

You can check it out here.

Also, watch for other ebooks to arrive periodically. Right now, I’m working on another ebook that will contain a year-round gardening activities calendar full of gardening tips for each month of the year, no matter what your growing season. Be sure to watch for it!

Happy gardening!

Heavenly Peas


One of my favorite garden vegetables are peas. From the time I was a little girl, I have loved to pick peas fresh out of the garden, pop them open and devour the sweet, tender peas nestled inside.


And, joy oh joy, the peas are nearly ready for the first harvest! Most years we would have been well into enjoying a bounty of peas by this time, with several harvests in the freezer (and under our belts – quite literally) but with the strange weather we’ve been having this year, the peas are only now beginning to fill out.

I planted the pea garden with two different types of peas this year; Little Marvels and Green Arrows, both purchased from Gurney’s Seed & Nursery  . The peas shown in the picture above are the Little Marvels and are already producing. The peas shown in the picture below are the Green Arrows and are just beginning to bloom.


Both types are bush peas and do not require staking, which is an added benefit to their high productivity and plump pods filled with sweet, tender peas.

By planting peas with varying times to maturity, we’ve managed to stretch the length of harvest and can savor the time of garden fresh peas even longer.

I hope your vegetable garden includes a pea patch and you and your family are enjoying all the taste and health benefits that garden fresh peas have to offer.

Happy gardening!


Don’t you just love the delicate beauty of the Bleeding Heart? This one is in its second year and simply thriving.

When I was a little girl, my grandmother had a Bleeding Heart in her shade garden at the front of her house. I was captivated by the curious little “hearts” that covered the delicate plant and knew that when I was grown up and had a garden of my own, a Bleeding Heart would most certainly grace it.

Here I am, many years later, and I finally have a Bleeding Heart that far surpasses the one in my grandmother’s garden.

So what’s the secret to a beautiful Bleeding Heart? Truth be told, I really don’t know how this one even survived, let alone thrives. We recently built an addition to our home and in the process we replaced the belly band and had the entire house repainted. The poor Bleeding Heart (and everything else in that particular flower bed) was abused in the process. A trench was dug next to it, dirt mounded on top of it and then scraped off again, and it was trompled unmercifully for several months. I was certain it was dead.

But, with the coming of spring it emerged and quickly grew into the thriving beauty shown in this picture. It has bloomed twice already this summer and is now in its third round of blooms. This picture was taken about a month ago and this Bleeding Heart has grown so much in that month that the mushrooms next to it are barely visible.

I am so impressed with this plant’s stamina and beauty that I recently planted another one in the corner shade garden, with hopes that it will do just as well at gracing the corner of the yard with its delicate bleeding hearts.

Happy gardening!
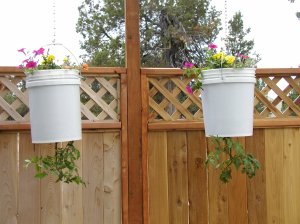
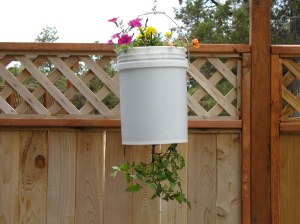
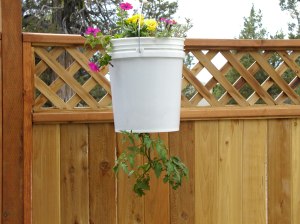
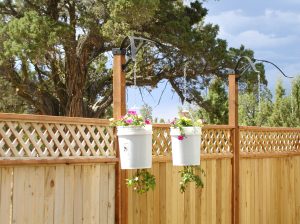
Here’s an update on the upside down tomatoes I planted as per the instructions in my previous post, Planting Upside Down Tomatoes, as well as some pictures. As you can see, they’re doing well. Especially considering they got a very late start and have only been in the buckets for about 2 weeks now.


This last picture shows the cool plant hangers my husband welded for hanging the upside down tomato plants on as well as a couple of other planters (I’ll be planting some more hanging baskets in the next few days to hang on the two empty hooks).


Happy gardening.

It looks as though I’ve finally found a place in our garden that’s sheltered enough for the Rosemary to make it through the winter. Hip-hip-hurrah!

Although Rosemary is considered a perennial in warmer regions, here in central Oregon, where winters are cold and harsh and usually accompanied by lots of snow, it’s commonly regarded as an annual.

There are ways to get around this though. One way is to plant the Rosemary in a big pot which is placed in the ground during the summer and then cleaned up and brought inside for the winter months. Not exactly what I care to do. If I grow Rosemary inside, it’s doomed to stay inside.

Another solution is to plant the Rosemary in a place that is adequately protected from the harsh winter elements. This is what I’ve attempted to do and it seems that I’ve found the perfect spot.

Last spring, after another year of losing our Rosemary to the harshness of winter, I planted a new plant in the protection of our privacy fence. It is now nestled up to a 6 ft. tall section, near an inside corner, and further sheltered by a small boulder. The result is beautiful in the summer and aparently adequate protection for the winter.

As we’ve had very little warm weather yet this season the rosemary is not back to its peak, but when it warms up enough for it to flourish, I will post pictures. Until then . . .

Happy gardening!

Yeah! I found the disc with pictures from our garden’s first year. These were taken in mid to late summer, 2006. 

Shade garden catnip ring 2006

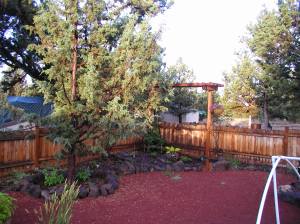
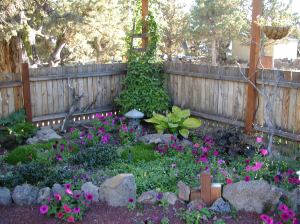
Corner shade garden and catnip tree ring in the first year, 2006.


Herb garden yr 1 2006

Herb garden in barrels, 2006.


Back garden area from south view

South view of our back garden area in its first year, 2006.


Vege garden view 1st yr

This is a view of the vegetable garden and the full-sun flower beds, 2006.

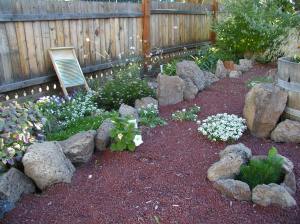
In the pictures (today’s and the ones in the last post) you’ll notice an old wooden chest and an old washboard. I have a passion for antiques and love scouting Estate sales and auctions. I keep an eye out for items that make unique planters. I found the wooden chest, washboard and an old milk pail (which sits by our small garden gate) all at the same Estate sale – score! 

I like to fill the milk pail with white Allysum, which spills over the sides and looks like a pail full of frothing milk. I don’t seem to have any pictures of it, but I will take some this summer and post them.

The wooden chest was lying on the property amid a bunch of “junk”. I noticed that several people looked at it and after lifting the lid, closed it and hurried off, not giving the chest a second glance. When I went to investigate I discovered the reason for their hasty retreat; the chest was a treasure trove of wasps. As it was an early spring morning the wasps were lethargic, so I carefully took the nest out of the chest and placed it inside another wooden box, which was in worse shape, and took my treasure home. With a little TLC, it has since made a beautiful planter for our garden. 

That’s it, all the pictures of our garden’s first and second seasons. I hope you enjoyed them! 

Happy gardening!

As I promised Shawn yesterday, here are some pictures of our garden in its first and second years – 2006 & 2007.

 The catnip in its 1st year

The catnip in its 2nd spring, 2007.


 Corner shade garden 2nd yr.

 Corner shade garden in its second spring, 2007 – the Petunias are all volunteers from the previous year.


Blue mist bluebeard

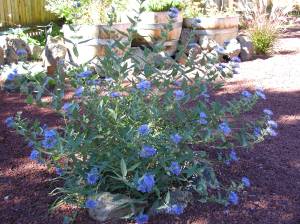
Blue Mist Blue Beard in its first summer – 2007.


Squash bed summer 2008

Squash bed summer 2007.


Partial shade bed

Shade/sun bed last summer, 2007.


Okay, that’s all the pictures for this post. I have some great pictures that show larger parts of the back garden in its first summer but they’re on a disc and I have to locate the disc and load them from there. I’ll do that in a later post.

I will post pictures periodically as my garden grows throughout the summer and fall. We’ll also be landscaping the front of our house so I’ll have lots of posts and pictures as we go through that exciting process (it’s pretty much all just bare canvas at the moment).

Happy Gardening!


Lately, I’ve been hearing a lot about upside down tomatoes so I thought it would make a good blog topic. Until recently I’d never even heard of it but I think it’s a good concept.


There are two main benefits to planting upside down tomatoes.


1.       Because the tomato plant grows upside down there’s no stress on the stem or branches, which, when planted in the ground carry quite a burden when heavy with a full crop of tomatoes.

2.       Because there’s no stress on the stem or branches of the upside down tomato plant there’s no need for staking. The plant hangs in the air, keeping the tomatoes well off the ground.


Another plus is that planting upside down tomatoes saves on space. Many gardeners have very little space in which to have a garden and so have turned to container gardening. This is a great solution, especially for those gardeners who live in the city, and the more containers that can be easily hung; the more room on the ground for bigger pots.


Using a 5 gallon bucket seems to be the most popular way of planting upside down tomatoes. However, if the thought of an ugly bucket hanging in your garden gives you the heebie-jeebies (as it does me) you can always decorate the outside of the bucket first.


Directions for planting upside down tomatoes in a 5 gallon bucket


Materials


·         A clean 5 gallon bucket

·         Small tomato plant

·         Potting Soil

·         Compost

·         Newspaper

·         Drill or other instrument for making a 2” hole in the bucket


First, take a clean 5 gallon bucket, remove the lid and turn the bucket upside down. Drill a 2″ hole in the bottom of the bucket.


Next, turn the bucket upright and place a layer of newspaper on the bottom, tearing it slightly where it covers the hole. Take your tomato seedling and gently work its stem and branches through the tear in the newspaper and out of the hole.


While holding on to the plant, put more newspaper (coffee filters will work as well) around the hole, making sure they tuck in tightly against the stem of the tomato plant.


Continuing to hold on to the plant, gently pack a thick layer of soil around the root ball, being sure it is fully supported before letting go of the tomato plant. Now fill the container to within an inch of the top with a soil/compost mixture, packing slightly.


Once you’ve filled the container, gently carry it to where you want it to hang and hang it from the handle. Water thoroughly until water drains from the hole in the bottom.


You can either leave the lid off for easy watering or replace it to retain moisture. If you choose to leave the lid off you may want to plant lettuce or herbs in the top, making even better use of container space.


Just make certain that whatever you plant in the top allows enough water to penetrate down through the bucket so that it drains out of the hole.


There you have it; simple instructions on planting upside down tomato plants in a 5 gallon bucket.


Yesterday, I read a post on a cooking blog about planting upside down tomatoes. The blog’s author planted her upside down tomatoes in a hanging basket. She simply cut holes in the coconut matting and planted the tomato seedlings on the basket’s underneath side. She then planted herbs in the top of the basket. I have six hanging baskets of the same type in my garden and I think I’m going to give her idea a try. She has pictures of the finished baskets on her blog, Eclectic Edibles, which you can check out by clicking here.


Once I try planting my own upside down tomatoes I’ll write another post on the subject and let you know what method I used and how it worked out. I’ll even try to include some pictures of the results.


I’d love to hear from you!


Have you ever grown upside down tomatoes? If so, what method did you use and what were the results? Have you done it more than once? Would you do it again?

 Well, it’s spring . . . I think!

 Monday started out with record breaking heat. Which got me outside and working in the back garden early in the morning (not really too early since I had to get my husband and son out the door, but while it was still cool anyway).


I enjoyed a good couple of hours engaged in spring weed pulling and garden clean up. I’m embarrassed to admit there were several things I should have done last fall but didn’t. So, I had to get those things taken care of first thing.


One example is the catnip. As an idea to deter our four – yes, I said four – cats from spending so much time in other parts of the garden, I planted a ring of catnip around a medium sized juniper. It does serve its purpose, but . . . have you ever grown catnip (or catmint as it’s also known)? If not trimmed faithfully, it can become quite the nuisance.


I put off trimming the catnip back last fall and left the stalks standing through the winter. This spring as I went out to begin my garden prep and winter cleanup, I knew I couldn’t avoid it any longer. The hard thick stalks that had once reached into the branches of the juniper were now folded over and covering the new shoots of Periwinkle vine (Vinca minor) and Shasta daisies (Chrysanthemum maximum). It had to go! 


After cutting out last year’s growth, I uncovered the plant’s new and highly fragrant growth – much to the joy of our cats, who now stay under the juniper, rolling and rubbing themselves silly on the stuff.


Now that the flower beds are cleaned up after the winter and the water system is turned on, I’m thrilled as I watch the flowers and plants emerging once again.


To see a garden in the spring, so full of fresh, new life after the long, bitter winter is to renew one’s faith in God and revive one’s spirit.